Hosting and automating a website

Table Of Content
- Introduction
- First Decision: What Are You Actually Hosting?
- Why GitHub Actions?
- Integrated Ecosystem
- Customizable Workflows
- Reduced Overhead
- The Importance of Automating the Deployment Process
- Building the Pipeline
- Step 1: Prepare Your Next.js Application
- Step 2: Set Up GitHub Actions
- Step 3: Deploying Elsewhere
- Step 4: Commit and Push
- Extending the Pipeline
- Conclusion
Exploring Website Hosting Methods and Automation in Backend, Hosting, and CI/CD
Introduction
For teams using Git and GitHub, GitHub Actions offers a seamless way to automate everything between git push and a live website. But before automating a deployment, it's worth being deliberate about what kind of deployment you're automating — because "hosting a website" is really three different problems depending on how your site is built, and the right pipeline follows from that choice. This guide covers the hosting models and their trade-offs, then builds a real GitHub Actions pipeline for a static Next.js site — including the caching, permissions, and concurrency details that separate a workflow that works from one that works well.
First Decision: What Are You Actually Hosting?
Modern websites deploy in one of three fundamental shapes, and everything downstream — cost, performance, pipeline design — follows from which one you pick.
Static hosting means your build step produces plain files (HTML, CSS, JS) and a CDN serves them. There is no server executing your code at request time, which means there is nothing to patch, nothing to scale, effectively nothing to attack, and hosting that is free or nearly so (GitHub Pages, Cloudflare Pages, S3 + CloudFront). The constraint: everything dynamic must happen either at build time (pre-rendered pages) or in the browser (client-side fetches to APIs). Blogs, portfolios, documentation, and marketing sites live here happily — this site does.
Serverless/hybrid hosting (Vercel, Netlify, AWS Amplify) runs your framework's server features — server-side rendering, API routes, incremental static regeneration — as managed functions, billed per use. You keep dynamic capability without operating servers. The trade-offs are real but manageable: cold starts add latency to infrequently-hit routes, costs scale with traffic in ways worth watching, and you take a dependency on the platform's conventions. This is the default choice for Next.js applications that outgrow pure static export — and it's why this site eventually moved to Vercel.
Server hosting (a VPS, containers, Kubernetes) means you run the process. Full control, persistent connections (WebSockets), long-running jobs, any runtime you want — and in exchange, patching, scaling, TLS renewal, and 3am responsibility are yours. The honest guidance: choose this when a requirement forces it, not as a default. A surprising amount of the internet is a static site wearing an expensive server costume.
The rest of this post builds the pipeline for the first model, with notes where the others differ.
Why GitHub Actions?
Integrated Ecosystem
GitHub Actions is deeply integrated with GitHub: commits, pull requests, build results, and deployments all live in one place, with no external CI service to wire up and no separate credentials to manage. For the pull-request workflow specifically, the integration is the feature — status checks gate merges, and deploy previews attach to the PR conversation.
Customizable Workflows
Workflows are YAML files in .github/workflows/, triggered by repository events (push, pull_request, schedules, manual dispatch) and composed from reusable actions in a large marketplace. Whether it's building a Next.js application, running tests, or deploying to any hosting provider, the same primitives apply.
Reduced Overhead
Automation removes the human from the repetitive path: the moment code is pushed, workflows lint, test, build, and deploy it. The consistency matters more than the convenience — an automated deploy is the same every time, which is precisely what manual deploys are not. Every serious outage postmortem that includes "the deploy was done by hand that day" makes the same argument.
The Importance of Automating the Deployment Process
Automating deployment with CI/CD is a strategic advantage, not a convenience: consistent deployments, a stable release process, and the fast feedback loops that agile development depends on. For static sites, automation means updates go live minutes after merge — keeping content fresh with zero ceremony. And critically, automation makes deploys boring, which is the correct emotional state for a deploy.
Building the Pipeline
Step 1: Prepare Your Next.js Application
Configure Next.js for static export. In modern Next.js (13.3+), the old next export command is replaced by a config option:
/** @type {import('next').NextConfig} */
const nextConfig = {
  output: "export", // static HTML export to ./out at build time
  images: { unoptimized: true }, // no server = no runtime image optimizer
};

module.exports = nextConfig;
The images line is the classic gotcha: Next's default image optimization runs on a server at request time, which a static export doesn't have — builds fail without this flag. This is also your reminder of the model's boundary: the moment you need genuine server-side rendering or API routes, you've outgrown output: "export" and belong on the serverless model instead.
Step 2: Set Up GitHub Actions
Create .github/workflows/deploy.yml. Here is a production-shaped workflow, followed by why each non-obvious line exists:
name: Deploy Next.js Site

on:
  push:
    branches: [main]
  workflow_dispatch: # manual runs from the Actions tab

permissions:
  contents: read
  pages: write
  id-token: write

concurrency:
  group: pages-deploy
  cancel-in-progress: true

jobs:
  build:
    runs-on: ubuntu-latest
    steps:
      - uses: actions/checkout@v4

      - name: Setup Node.js
        uses: actions/setup-node@v4
        with:
          node-version: 20
          cache: npm # caches ~/.npm keyed on package-lock.json

      - name: Restore Next.js build cache
        uses: actions/cache@v4
        with:
          path: .next/cache
          key: nextjs-${{ hashFiles('package-lock.json') }}-${{ hashFiles('**/*.js', '**/*.jsx') }}
          restore-keys: nextjs-${{ hashFiles('package-lock.json') }}-

      - name: Install dependencies
        run: npm ci # clean install from the lockfile — never plain `npm install` in CI

      - name: Build
        run: npm run build

      - name: Upload artifact
        uses: actions/upload-pages-artifact@v3
        with:
          path: ./out

  deploy:
    needs: build
    runs-on: ubuntu-latest
    environment:
      name: github-pages
      url: ${{ steps.deployment.outputs.page_url }}
    steps:
      - name: Deploy to GitHub Pages
        id: deployment
        uses: actions/deploy-pages@v4
The details that earn their lines:
permissionsis a security boundary. The defaultGITHUB_TOKENhistorically had broad write access; declaring the minimum (read code, write Pages, mint an OIDC token) is the workflow-level version of least privilege.concurrencywithcancel-in-progressprevents the classic race: two quick pushes, two parallel deploys, and the older one finishing last — silently shipping stale code. One group, latest wins.npm ci, nevernpm install.ciinstalls exactly the lockfile — reproducible builds — and fails loudly if lockfile and manifest disagree, which is a bug you want to hear about in CI rather than discover in production.- Two caches, two purposes. The
setup-nodecache skips re-downloading packages; the.next/cachecache lets Next.js skip recompiling unchanged pages — together they routinely cut build times by half or more, which matters compounded over hundreds of deploys. - Build and deploy as separate jobs means the deploy step touches only a finished artifact — and the
environmentblock gives you a deployment history and the option of protection rules (required reviewers for production) later, without restructuring.
Step 3: Deploying Elsewhere
The build half of the workflow is portable; only the last step changes. Deploying to Vercel or Netlify, you typically don't write this workflow at all — their GitHub integrations build on push and, more valuably, deploy preview environments for every pull request, which changes review culture: reviewers click the deployed branch instead of imagining it. Deploying to S3 + CloudFront, the final step becomes aws s3 sync ./out s3://bucket plus a CloudFront invalidation, authenticated via OIDC (aws-actions/configure-aws-credentials with a role, no long-lived keys in secrets — this is what the id-token: write permission enables). The pattern generalizes: artifact, credentials via OIDC, provider CLI.
Step 4: Commit and Push
git add .github/workflows/deploy.yml
git commit -m "ci: add GitHub Actions deployment pipeline"
git push origin main
The first run appears in the Actions tab; every subsequent push to main deploys automatically.
Extending the Pipeline
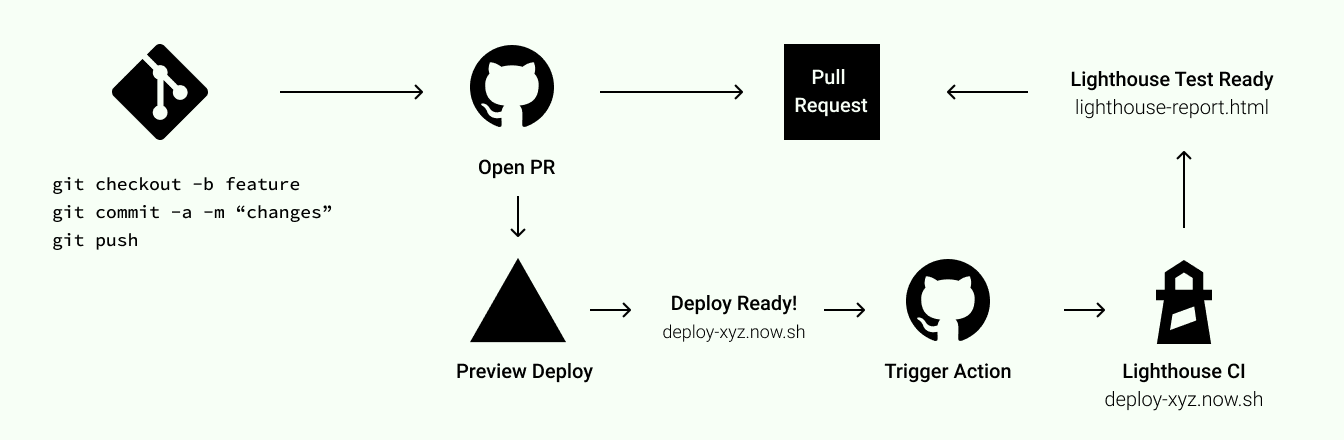
Once the deploy works, the pipeline is where quality gates accumulate — each one a pull-request check rather than a production surprise: npm run lint and tsc --noEmit before the build; Lighthouse CI to catch performance and accessibility regressions with budgets ("fail if LCP exceeds 2.5s"); a link checker for content sites, because dead links rot silently; and scheduled dependency updates via Dependabot or Renovate so security patches arrive as small reviewable PRs instead of a quarterly upgrade crisis. None of these require new infrastructure — they are steps in a file you already have.
Conclusion
You've now got more than a deployment script — you've got the shape of a real delivery pipeline: a deliberate hosting model, a reproducible build (npm ci, pinned Node, cached correctly), least-privilege permissions, race-free deploys, and a clear seam where quality gates and other providers slot in. The specifics will vary with your host and your framework's features, but the principles — static until forced otherwise, automate everything after the push, make deploys identical and boring — transfer to every project you'll ship. Adjust the workflow as needed to fit your setup, and let the robots do the deploying.